Showing posts with label recycled projects. Show all posts

Sunday, June 26, 2011

getting rid of clutter one shoe at a time


Though some may like this "LOOK" I was getting tired of it!


I was trying to find a solution When I ran across a "shoe cabinet"


in a Japanese table book!
" Brilliant" I exclaimed!! Well not really but I wanted to!


Any way while shopping for one just the right size and price I scored this baby ( for only 27.00).


( in it's first life it was a corner tv cabinet). As usual I didn't get a real" before" pic. First the hubs added a matching bull nose to the three sides of the top that had been flat, took off the masonite back and side panels with ply-wood and trimmed it out.
It was then kilzed, painted out with old paint (Alabaster by Valspar) I'd used on another project, added new knobs.


Wanting a fun surprise I painted the inside THIS color!


(Spa blue by Decoart)
Now we have a shoe cozy!
What do you think?

Friday, April 15, 2011

Making crayons using crayons


Today I only had my grandsons for a short time, but I wanted Connor who is 5 to have some Activity to do with his Mimi.

Ollie is only one, so he watched!


So we made (re-made) crayons! I got these boxes of crayons for 23 cents a box, and since I have a very limited amount of old crayons I used these.

First Connor peeled off the paper.


Then we broke them in smaller pieces. I let Connor decide what colors to put in the silicone pan.


(I got the pan at Hobby Lobby for under $2.00 in the summer party area.)


AN ADULT NEEDS TO DO THE NEXT FEW STEPS!!! I then put the pan on a sturdy baking stone (any cookie sheet will do) and placed it into a pre- heated oven @350%. Then sat and watched as the wax melted.


DO NOT LEAVE THE KITCHEN WHEN YOU ARE MELTING WAX!!!!!


it took about 6 Minutes. CAREFULLY remove the HOT wax from the oven.


I let them get cool to the touch on top of the stove,


then put pan in frig till the crayons were fully hardened


(about 10 min). Then I let Connor pop


out his new crayons and start coloring.


He told me "I've never made these only in my dreams!!!"


then I melted yes... pun intended

Sunday, October 3, 2010

Starring the I pad.....Drum roll please!

While at best buy looking for a new modem ,I came across the i pad.
The hubs has been drooling (I mean researching) them for a while and thought it would be fun to have one, and I'm here to tell you It is!! We came home with one that very night.
Looking at the plethora of sleeves they were selling I decided I could make one for way less $$
So...I did. I was on tip nut this morn and there was a wonderful tutorial by Shelly Miller Leer to make this awesome sleeve. This was very easy and I had everything I needed including a suede coat that I used for the trim. What do you think??


Thursday, April 29, 2010

Old into new

I GOT THIS BEAUTIFUL ANTIQUE CRAFTSMAN ROCKING CHAIR FROM MY SISTER!
**Double click on the pictures to enlarge**
after much elbow grease and refinisher, it looked like this.

With these tools I began to take off the leather,tacks and
Several layers of burlap and some kind of straw-like substance.

the chair had a nice set of springs in pretty good shape.
check out the 100 yrs. of dust!!!

I was very pleased to find out that there were finished slats
in the back! I will not cover over those.
I'll be back with more !


Wednesday, October 28, 2009

Some Projects, PDF and Patterns

Here are some of the things that I've been working on.


Sock Sacks

This Sock sack tutorial is from http://terryatkinson.typepad.com/


The original use is for holding yarn and needles while making socks. The small loops on top go around your wrists as you "knit away," but your yarn won't "get away." Sorry I couldn't help it. I made 2 out of 2 fat quarters! Just in reverse. Very quick, very fun.

Thanks Terry.


The big gulp cozy


I have made quite a few coffee cozies, but my daughter S. asked if I could make something to keep cold drinks from sweating as S. does not drink coffee. I came up with something like this only smaller. It's the same concept as a coffee cozy, but has terry on the back. S. then asked if I could make her friend one for a Big Gulp.
I have made a PDF but I can't get Blogger to accept it (hmmmfp)
Well here it is! Thanks for the help Christina!
These adorable bags are fat quarter friendly!


for the Poochie Bag comes from the Happy Zombie.

The pattern is easy to read and easy to make.

Thanks Monica!


Manicure Kit

How about this neat Manicure kit cover as a Holiday gift for a teacher or friend?
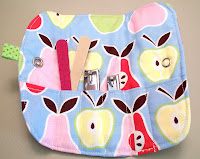


go to get a free PDF download!

You can give it empty, or get some manicure items and fill it like I did. Quick, easy and fabulous!

Love the Alexander Henry Apples + Pears fabric.


Here is a Dear Rabbit.

I love Betz's cashmere bunny!
but I needed to changed up the pattern a bit, I added a tail (using the top half of the ear pattern I made a tail pattern. )I sewed everything so it could be given to a new- born, and not worry about things falling off. The bunny is made of soft Minke, the heart is suede, and the eyes and mouth are embroidery floss. I filled it with soft filling.


I got this pattern/Tutorial from http://blog.betzwhite.com/2007/03/cashmere-bunny-tutorial.html
Thank You Betz!

Here is one of my baby toys

You know the crinkle toys?
Well, I re-purposed that bag that is in the cereal box to make my own. I opened it up and wiped it clean and then cut a square 4x4 (same as the fabric squares).Then I cut 9 pieces of coordinating ribbon, folded each in half and pined to the right side of one piece of fabric, and sewed all around to secure. Then, I layered the 2 fabric squares' right sides together (ribbon facing in), pined the bag square to the top, and sewed the four sides--leaving a small hole to turn the project. Next I pressed the fabric, added a very small amount of batting, stitched up the opening and top stitched 2 rows. As a final touch, I added a teething ring.

Friday, April 17, 2009

I'm Hooked!

...Thanks to Jessica at How About Orange for her post on 4-14, and Rae at Made By Rae for the FREE buttercup purse pattern!

As you can see, I had an old vest. It wasn't so pretty (as a vest that is!), but as the buttercup purse it's adorable. I used the tie from the back instead of the placket and buttons. Here are the before and after pics. I Can't wait to start another one! I have some cherry fabric I've been wanting to use.

******note******
If you take the pattern and transfer it on to cardboard, you can just trace around the pieces with a marking pen and no more pins!

Click pictures for larger view.


Making