Here are some of the things that I've been working on.
Sock Sacks


The original use is for holding yarn and needles while making socks. The small loops on top go around your wrists as you "knit away," but your yarn won't "get away." Sorry I couldn't help it. I made 2 out of 2 fat quarters! Just in reverse. Very quick, very fun.
Thanks Terry.
The big gulp cozy
I have made quite a few coffee cozies, but my daughter S. asked if I could make something to keep cold drinks from sweating as S. does not drink coffee. I came up with something like this only smaller. It's the same concept as a coffee cozy, but has terry on the back. S. then asked if I could make her friend one for a Big Gulp.
I have made a PDF but I can't get Blogger to accept it (hmmmfp)
Well here it is! Thanks for the help
Christina!
These adorable bags are fat quarter friendly!
The pattern is easy to read and easy to make.
Thanks Monica!
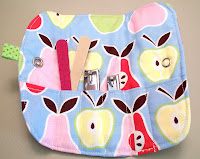
Manicure KitHow about this neat
Manicure kit cover as a Holiday gift for a teacher or friend?


go to get a
free PDF download!
You can give it empty, or get some manicure items and fill it like I did. Quick, easy and fabulous!
Love the Alexander Henry Apples + Pears fabric.
Here is a Dear Rabbit.
I love Betz's cashmere bunny!
but I needed to changed up the pattern a bit, I added a tail (using the top half of the ear pattern I made a tail pattern. )I sewed everything so it could be given to a new- born, and not worry about things falling off. The bunny is made of soft Minke, the heart is suede, and the eyes and mouth are embroidery floss. I filled it with soft filling.
You know the crinkle toys?
Well, I re-purposed that bag that is in the cereal box to make my own. I opened it up and wiped it clean and then cut a square 4x4 (same as the fabric squares).Then I cut 9 pieces of coordinating ribbon, folded each in half and pined to the right side of one piece of fabric, and sewed all around to secure. Then, I layered the 2 fabric squares' right sides together (ribbon facing in), pined the bag square to the top, and sewed the four sides--leaving a small hole to turn the project. Next I pressed the fabric, added a very small amount of batting, stitched up the opening and top stitched 2 rows. As a final touch, I added a teething ring.


